In my last post (“Google+ Pages for Brands Are Here NOW! Why You Must Get One“), I gave reasons why I think it is essential that your business claim a Google+ Page for Brands. Now that you’ve got your Page, what do you do with it?
Optimizing Your Google+ Page for SEO
I would say that priority #1 should be making your pages more SEO friendly, both for regular Google search and for search within Google+.
The importance of doing this was underscored by some updates on Google’s various official blogs:
- Google is improving search by “Refining official page detection: We try hard to give our users the most relevant and authoritative results. With this change, we adjusted how we attempt to determine which pages are official. This will tend to rank official websites even higher in our ranking.” I believe a Google+ page linked to your site with Google verification (see our post “How to Verify Your Google+ Brand Page with Google“) will be an important part of signalling to Google that your site is the “official” one for your brand.
- As of November 15, verified Google+ brand pages are showing up in regular Google search. Individual posts by both individuals and Pages are showing up as well. This is a huge opportunity to grab more of the front page real estate on Google search, and will mean even more for those brands that need to do some reputation management in Google results.
Here’s some things you should do (To edit your Page, on your Page’s About tab, click the Edit Page button at upper right, and then click on each area to edit):
Note: Some features will vary between different types of Pages. For example, local business Pages do not have a subtitle, but instead feature your business address under the Page title.
- Feel free to use the Virante G+ Page as a model: https://plus.google.com/u/0/109417353800451599337/about (and please add us to your circles, while you’re there!)
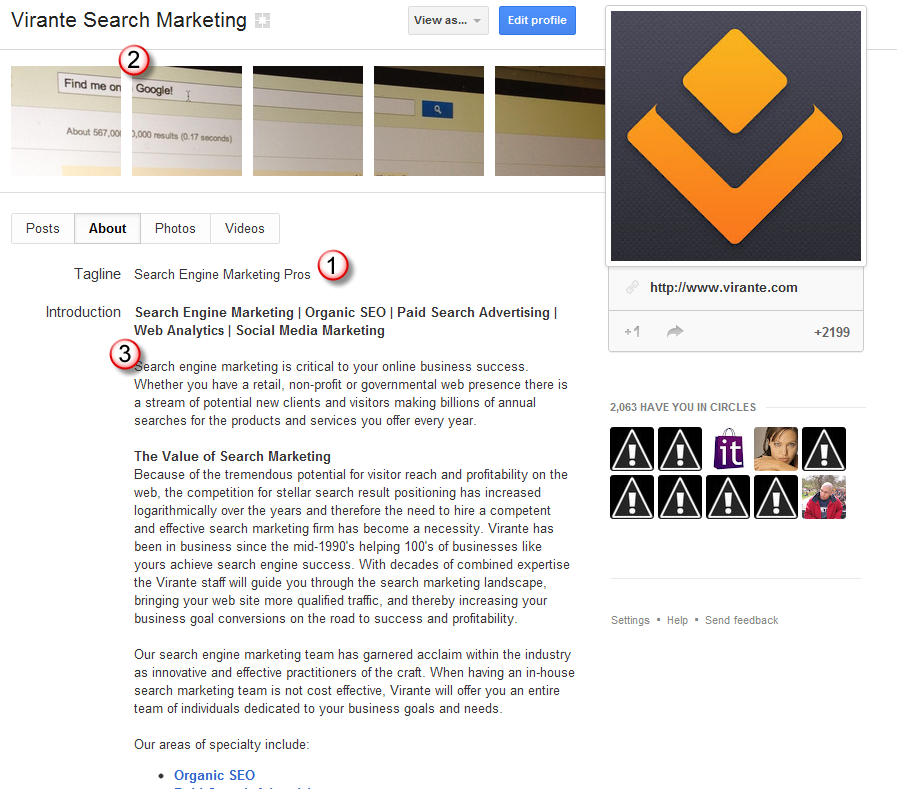
- Add a tag line under your Page’s name (#1 in image above). Only the first 10 words you enter are visible in the page header, and only the first 21 characters are shown in the popup that people see when they roll their mouse over your page name. Make it descriptive and use search keywords (e.g. “Premier Lower Manhattan Luxury Hotel”).
- Add “scrapbook” photos under the Page title (#2 in image above). You can add five. They should be photos that represent your business well. Use your page title in the file name of each photo (e.g., mybusiness_front_view.jpg). You will now also be given the option of uploading one larger photo, similar to Facebook’s cover photo for Timeline.
- Add a complete Introduction (#3 in image above). Use keywords (like “oceanfront Atlantic City resort”) in the introduction, but as always in SEO, don’t overdo them. Keep it natural. You can use rich text formatting (bold, italics, lists, etc.) and include links (perhaps to internal pages on your web site, such as “Accommodations”). Wherever possible, and naturally fitting, make your main keyword phrases bold subheadings in the introduction. Google pays more attention to words in bolded headings on regular web pages; the same is likely to be true on Google+.
- In the Website section below the Introduction (not shown in illustration) make sure the link is to your official web site (the one you’ll place a verification link to in step 7 below). If you specified a site when setting up your page, it will already be there.
- Add Links below the Introduction (not shown in illustration). Again, these can be links to your home page and to internal pages on your site, even if they repeat links that are in the Intro text.
- Add the following to the header HTML section of the site associated with the Page: <link href=”https://plus.google.com/xxxxxxx” rel=”publisher” />, with the xxxxxx replaced with the ID number of your Google+ Page. You’ll find the ID number as part of the URL for your Page. For example, the URL for Virante’s Page is https://plus.google.com/u/0/109417353800451599337/ so our ID number is 109417353800451599337. The above code snippet will serve to verify to Google that your Page is authentic (as long as you also have a link to your home page on your Google+ Page). OR simply add a Google+ Badge to your site (click the link to customize yours and get the code). In any event, it is worth adding the badge to your site now because it will serve to verify your Page to Google (again, make sure you also have a link to your site on your Page!). We have complete instructions on how to do this in our post “How to Verify Your Google+ Brand Page with Google“
- This one is cosmetic, rather than SEO-necessary, but will help tidy up your page. You can temporarily remove any tabs that you aren’t currently using. To do this, click the Edit Page button in your profile view, go to either the Photos or Videos tab, and uncheck the “show this” box. You can undo this at any time. Better to not show a tab that has no content so as not to risk frustrating visitor.

- Link your AdWords advertising. You can now add a “social extension” in AdWords that connects your Google+ Page with your AdWords ads. Why do you want to do this? Because once you do, Google aggregates all the +1s you receive, whether on an ad, on your Google+ Page, or on your web site. This means that the number next to the +1 icon in all three places has the potential to be much higher, which is a great trust marker for your ads. Follow Google’s instructions to add this extension to your Adwords ads.
Getting Followers for Your Google+ Page
Getting started on getting people to follow your Pages will be as challenging in the beginning as it was on Facebook or Twitter. As on Facebook, you can’t arbitrarily follow people from your page (in the hope that they will follow you back). Rather you must encourage people to first follow you, and then encourage followers to invite others. To kick things off, try these tips:
- Certainly post a link to your new Google+ page on your other social media, email newsletters, and on your site, inviting followers there to add your page to their circles on Google+.
- Put the new Google+ Badge on your site (instructions here). This links to your Google+ Page and helps verify your Page with Google (see “How to Verify Your Google+ Brand Page with Google“)
- Once you start getting some followers on your Page, be sure to follow them back. Do that by clicking the Circles icon at the top of your Page and then clicking on “People who’ve added you.” Sort by “Not yet in circles.” Drag anyone who doesn’t have a little circle in their “brick” to one of your Circles. Each follower will get a notification that you’ve added them (though it won’t tell them to what circle), which is a nice way of saying “We’re glad you’ve followed us!” At some point you might want to think strategically about creating circles of your own, if there are ways you can segment your followers (“key customers”?) so you can post updates only to those in a particular circle, if you want.
- You can’t follow individuals from your Page unless they have first followed you. But if you have a personal Google+ profile (and you have established through it that you are an authority in your Page’s field), use Google+ search to find people and pages who post about your topics. Follow them in the hope that they will follow you back, and become a target (don’t spam!) for your reshares of your Page’s posts.
From that point, the “rules” for increasing following are the same as in other social media: post interesting, relevant content; ask questions that get people to comment and engage; and don’t be shy about asking followers to share your posts with their friends.
*On Google+ in particular you will want to post photos and videos as much as possible. Google+ displays media in follower’s streams more prominently and pleasingly than Facebook, so it’s a big “plus” here to call attention to your posts.
*********
If you benefited from this guide, you’ll want to check out our complete listing of guides to using Google+ for business.


